Building a Repeatable Thumbnail Generator with Claude Code
Every time we host a LinkedIn Live webinar, we need a thumbnail — speaker photos, title, brand colors, consistent layout. This example shows how we replaced a repetitive workflow with a Fused Canvas that anyone on the team can open, fill in, and download in under a minute.
The problem
Making a good-looking thumbnail from scratch every time has three failure modes:
- Inconsistency — fonts, spacing, and colors drift between events.
- Bottleneck — only the person who made the first one knows how.
- Friction — a Figma file or Photoshop template is hard to share, version, or hand off.
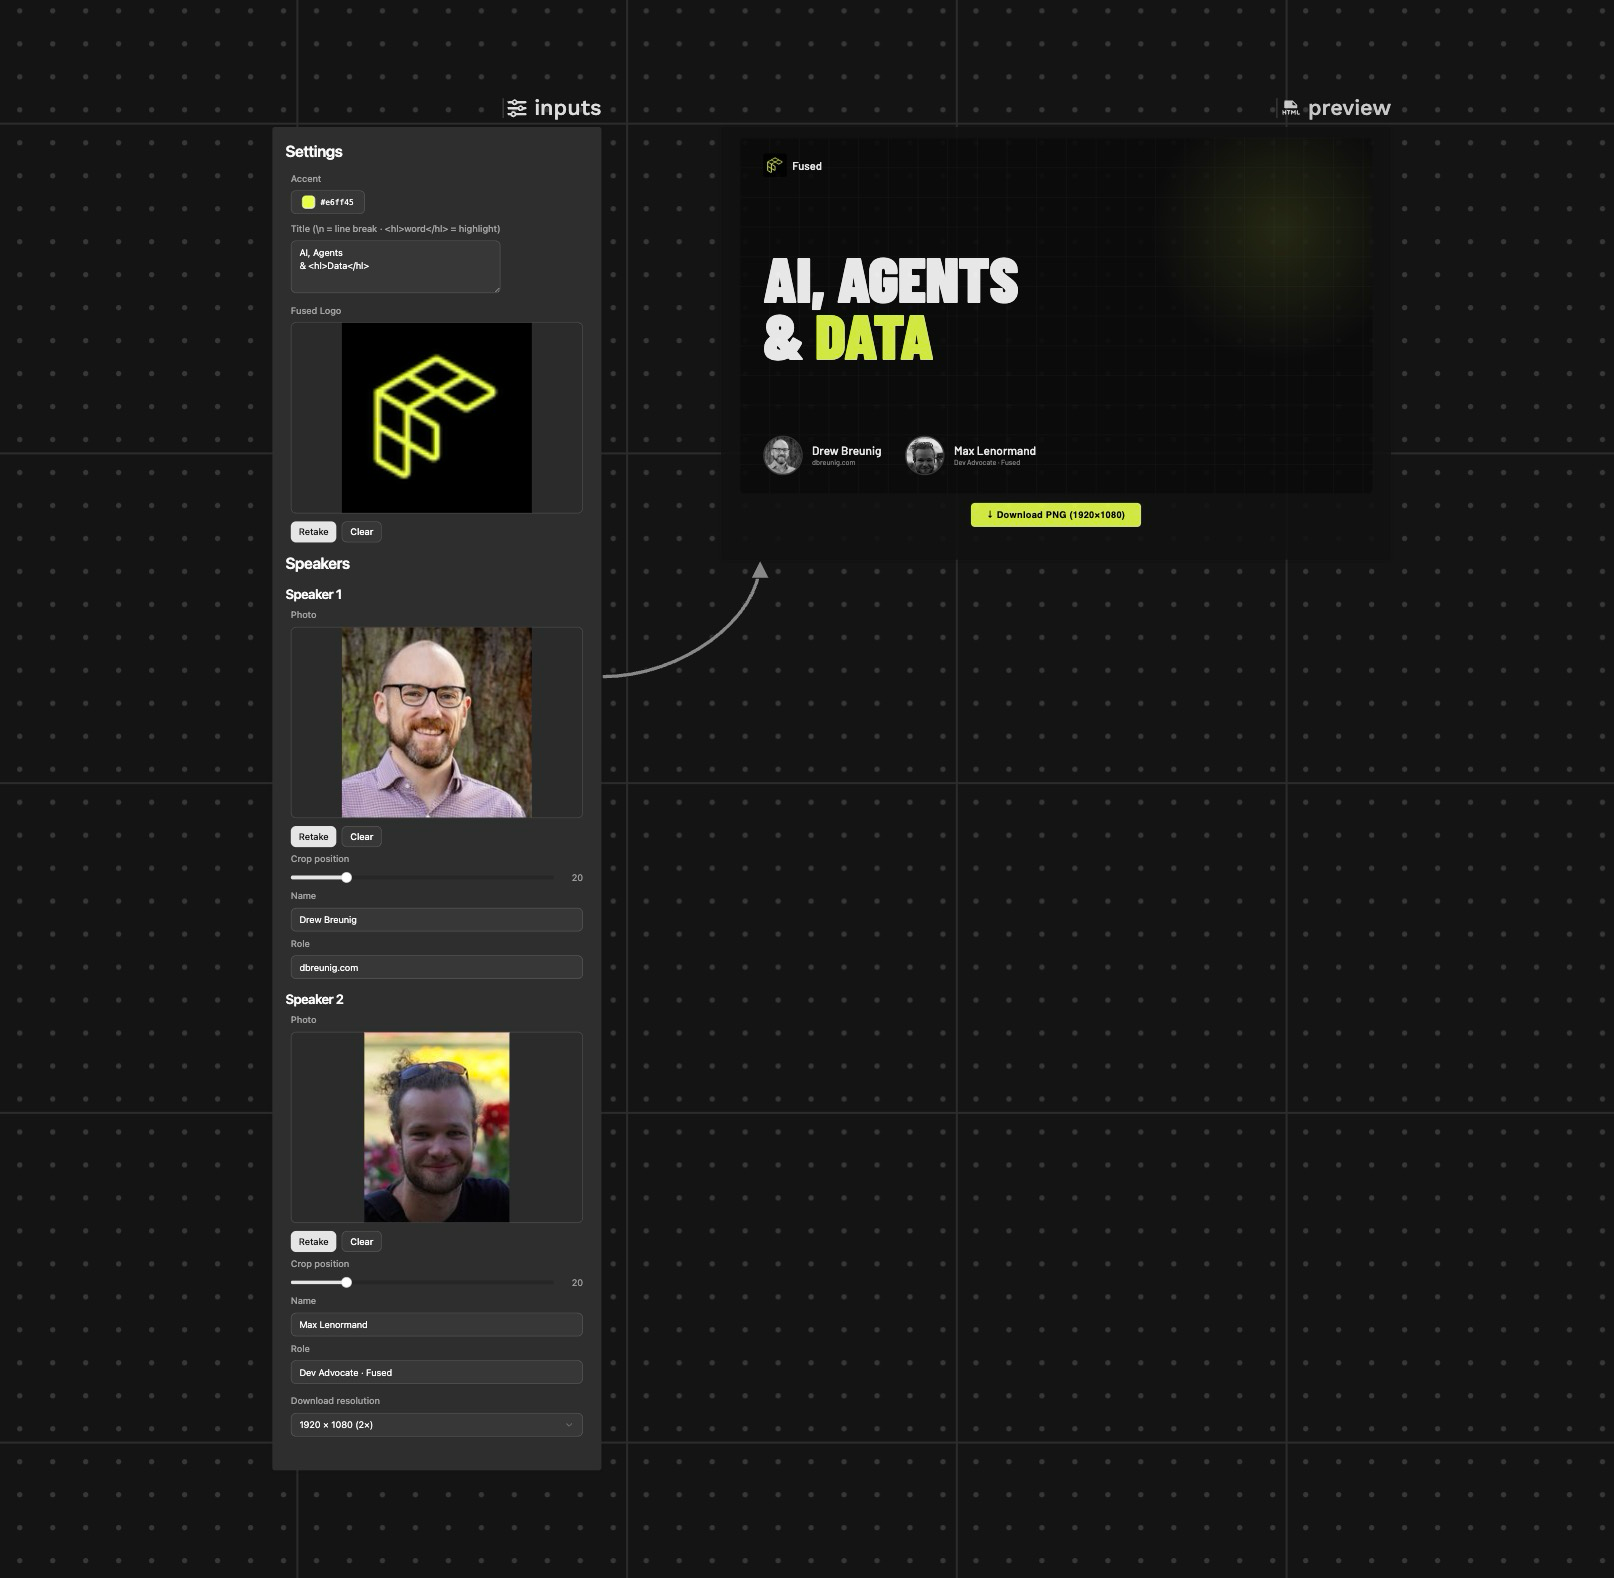
What we wanted: one URL, shared with the team, where swapping speakers and a title produces a pixel-perfect 960×540 PNG ready for LinkedIn.
How we built it
1. Start with an HTML prototype
Before touching Fused, we had Claude Code generate a self-contained HTML file that matched the thumbnail design: dark background with a grid overlay, a large Barlow Condensed title with an accent-color highlight, circular speaker avatars, and the Fused logo in the top corner.
This step is fast and visual — you can open the file in a browser and iterate on styling without any infrastructure. The HTML becomes the ground truth for everything that follows.
2. Set up the Fused Claude Code skill
Install the Fused plugin for Claude Code so Claude understands how Fused canvases, widgets, and the CLI work:
fused claude plugin add
This gives Claude Code access to the canvas-toml, json-ui-schemas, and fused-cli skills — the context it needs to write correct canvas files without guessing.
3. Ask Claude Code to build the canvas
With the HTML prototype and Fused skills loaded, we asked Claude Code to turn the HTML file into a Fused Canvas. It produced three files:
canvas.toml — defines the two-node layout: an inputs panel on the left and an HTML preview on the right, wired together with an edge so parameter changes propagate live.
type = "canvas"
version = 2
name = "Thumbnail Generator"

[canvas]
edges = [["inputs", "preview"]]

[[canvas.nodes]]
udfName = "inputs"
title = "Inputs"
x = 0.0
y = 0.0
zIndex = 1
width = 460
height = 860

[[canvas.nodes]]
udfName = "preview"
title = "Preview"
x = 490.0
y = 0.0
zIndex = 2
width = 1020
height = 660
inputs.json — a JSON UI widget with all the controls: accent color picker, title text area, camera inputs for speaker photos with crop-position sliders, and a resolution dropdown for the export.
preview.html — the thumbnail HTML from step 1, with $param_name placeholders substituted live as inputs change. A download button at the bottom uses html2canvas to export a PNG at the chosen resolution.
The three-file structure (canvas.toml + inputs.json + preview.html) is the full spec for a Fused Canvas. An agent with the Fused skills loaded can generate all three from a description or an existing HTML file without any manual steps.
4. Validate and push
Before pushing, validate the widget JSON:
fused json-ui validate inputs.json
Then push the canvas folder directly to Fused:
fused canvas push ./LinkedIn_Live_thumbnail_generator --canvas LinkedIn_Live_thumbnail_generator
Canvas names must match [a-zA-Z0-9_] — no spaces or hyphens.
That's it. The canvas is live at fused.io/workbench/<team>/LinkedIn_Live_thumbnail_generator and the whole team can open it immediately.
5. Iterate in the canvas, version in git
The canvas folder lives in a git repo. Changing a color, adjusting spacing, or adding a third speaker slot means editing the files locally, running fused canvas push again, and committing. The canvas URL stays the same — teammates refresh and get the update.
The inputs panel in the final canvas:
- Accent color — color picker, default
#E5FF44 - Title — text area;
\nfor line breaks,<hl>word</hl>to highlight a word in accent color - Fused Logo — camera/upload input with the logo pre-loaded as default
- Speaker 1 & 2 — photo upload, crop-position slider (0 = top of photo, 100 = bottom), name, role
- Download resolution — 1× (960×540), 2× (1920×1080), 3× (2880×1620)
Try it out
Open the live canvas, swap in your own speakers and title, and hit Download PNG.
Clone the canvas folder, edit inputs.json to change defaults (pre-load your team's logo and headshots), and push under a new canvas name. Anyone with the URL can generate on-brand thumbnails without Figma, Photoshop, or any design tool.