🐳 On-prem
Fused offers an on-prem version of the application in a Docker container. The container runs in your computing environment (such as AWS, GCP, or Azure) and your data stays under your control.
The container image is currently distributed via a private release. Email info@fused.io for access.
Fused On-Prem Docker Installation Guide
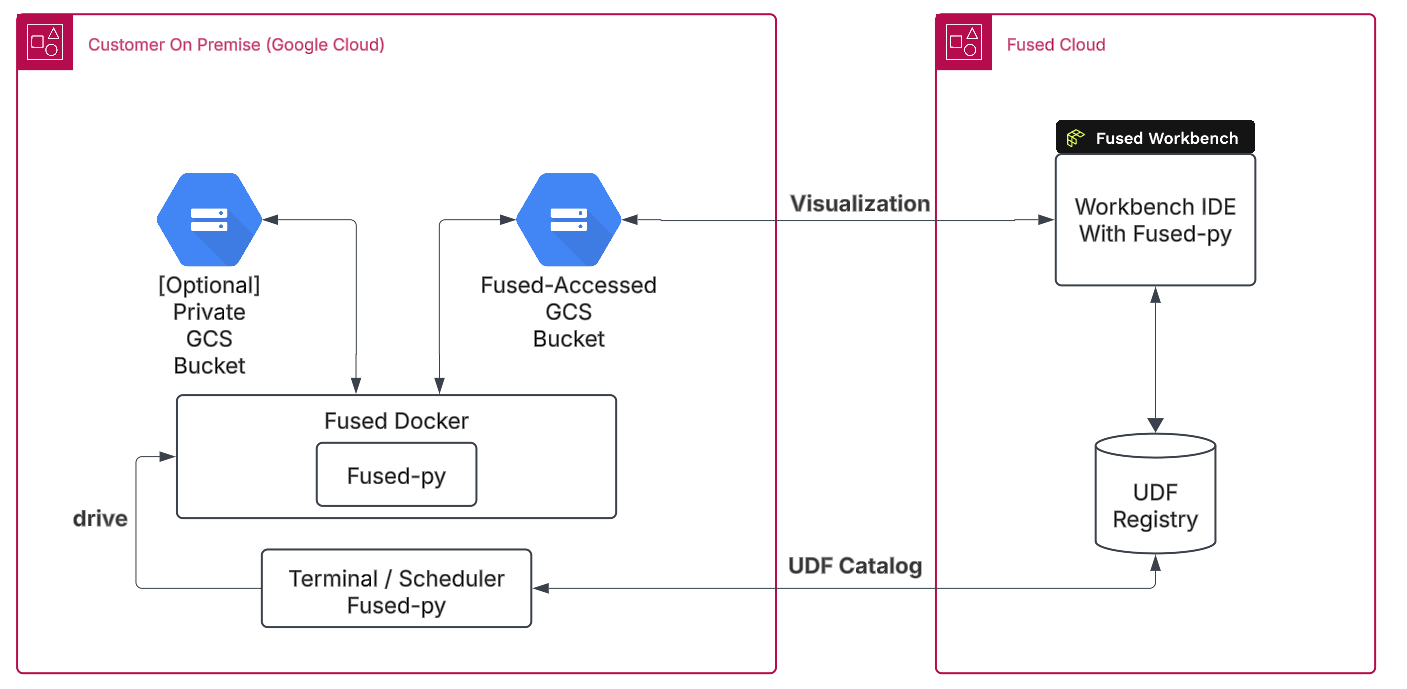
Diagram of the System Architecture
1. Install Docker
Follow these steps to install Docker on a bare-metal environment:
Step 1: Update System Packages
Ensure your system is up-to-date:
sudo apt update && sudo apt upgrade -y
Step 2: Start & Enable Docker
sudo apt install -y ca-certificates curl gnupg
sudo install -m 0755 -d /etc/apt/keyrings
curl -fsSL https://download.docker.com/linux/debian/gpg | sudo tee /etc/apt/keyrings/docker.asc > /dev/null
sudo chmod a+r /etc/apt/keyrings/docker.asc
echo "deb [arch=$(dpkg --print-architecture) signed-by=/etc/apt/keyrings/docker.asc] https://download.docker.com/linux/debian $(lsb_release -cs) stable" | sudo tee /etc/apt/sources.list.d/docker.list > /dev/null
sudo apt update
sudo apt install -y docker-ce docker-ce-cli containerd.io docker-buildx-plugin docker-compose-plugin
sudo systemctl enable docker
sudo systemctl start docker
Step 3: Add Docker Permission to local user (after this command is run, the shell session must be restarted)
sudo usermod -G docker $(whoami)
Step 4: Configure Artifact Registry
gcloud auth configure-docker us-west1-docker.pkg.dev
2. Install Dependencies and Create Virtual Environment
Step 1: Install pip
sudo apt install python3-pip python3.11-venv
Step 2: Create virtual environment
python3 -m venv venv
Step 3: Activate virtual environment
source venv/bin/activate
Step 4: Install Fused and dependencies
pip install pandas ipython https://fused-magic.s3.us-west-2.amazonaws.com/fused-1.14.1.dev2%2B2c8d59a-py3-none-any.whl
3. Configure Fused on the Docker container
Run the following in a Python environment within the container to configure the on-prem profile. The Fused team will provide values specific to your account via secure communication.
# Run this locally - not in Workbench
import fused

fused.options.base_url = "***"
fused.options.auth.client_id = "***"
fused.options.auth.client_secret = "***"
fused.options.auth.audience = "***"
fused.options.auth.oauth_token_url = "***"
fused.options.auth.authorize_url = "***"

fused.options.save()
The code above only needs to be run once. After this is complete, Fused will use the local configuration for future batch jobs.
If Fused has already been configured for batch jobs, you may need to remove the local ~/.fused directory before running the above code.
4. Authenticate an individual Fused user account
Step 1: Start a Python shell
python
Step 2: Obtain credentials URL
# Run this locally - not in Workbench
import fused
credentials = fused.api.NotebookCredentials()
credentials.url
Step 3: Go to the credentials URL from the prior step in a web browser. Copy the code that is generated and paste into Python.
# Run this locally - not in Workbench
credentials.finalize(code="xxxxxxxxxxxxxxx")
5. Create Google Cloud service account key and add to Fused
Step 1:
In Google Cloud Console, go to IAM & Admin > Service Accounts. Select the service account you want to use, click on the three dots on the right, and select Manage Keys. Choose JSON and download the key.
Step 2:
Login to the Fused workbench environment settings. Click Add new secret. For name use gcs_fused and for value paste the contents of the JSON key file.
6. Run Fused API: Test UDF
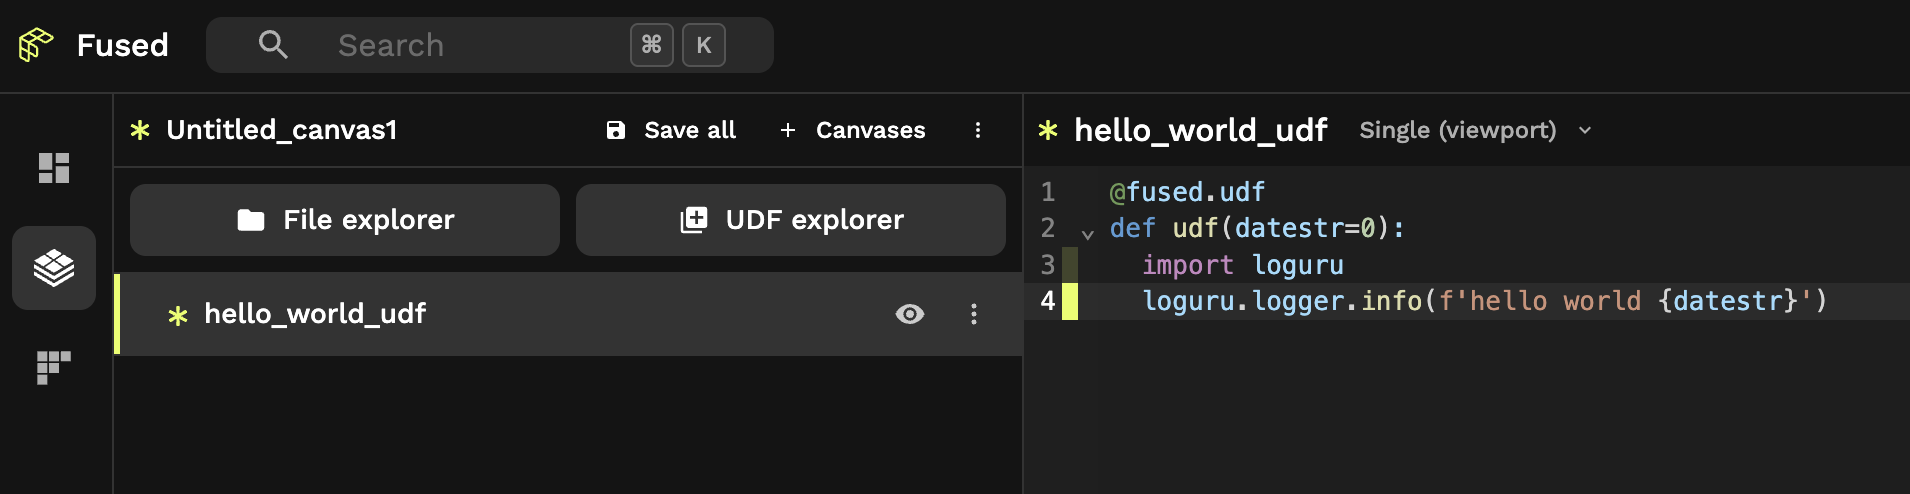
Step 1: Open Fused Workbench, create a "New UDF" and copy this UDF to Workbench:
# Run this locally in notebook - not in Workbench
@fused.udf
def udf(datestr=0):
  import loguru
  loguru.logger.info(f'hello world {datestr}')
Step 2: Rename this UDF to "hello_world_udf" & Save
Step 3: Start a Python shell
python
Step 4: Run UDF from Python
# Run this locally - not in Workbench
import fused

fused.api.FusedAPI()

my_udf = fused.load("hello_world_udf") # Make sure this is the same name as the UDF you saved
job = my_udf(arg_list=[1, 2])
fused.api.FusedDockerAPI(
  set_global_api=True,
  is_gcp=True,
  repository="us-west1-docker.pkg.dev/daring-agent-375719/fused-job2/fused-job2",
  additional_docker_args=[
    "-e","FUSED_SERVER_ROOT=https://app.fused.io/server/v1"
  ]
)

job_status = job.run_batch()
job_status.run_and_tail_output()
Optionally, to mount a filestore volume to the node that runs the job, add the following to the additional_docker_args. This assumes that filestore is mounted at /mnt/cache on the host machine.
# Run this locally - not in Workbench
additional_docker_args=["-v", "/mnt/cache:/mnt/cache"]
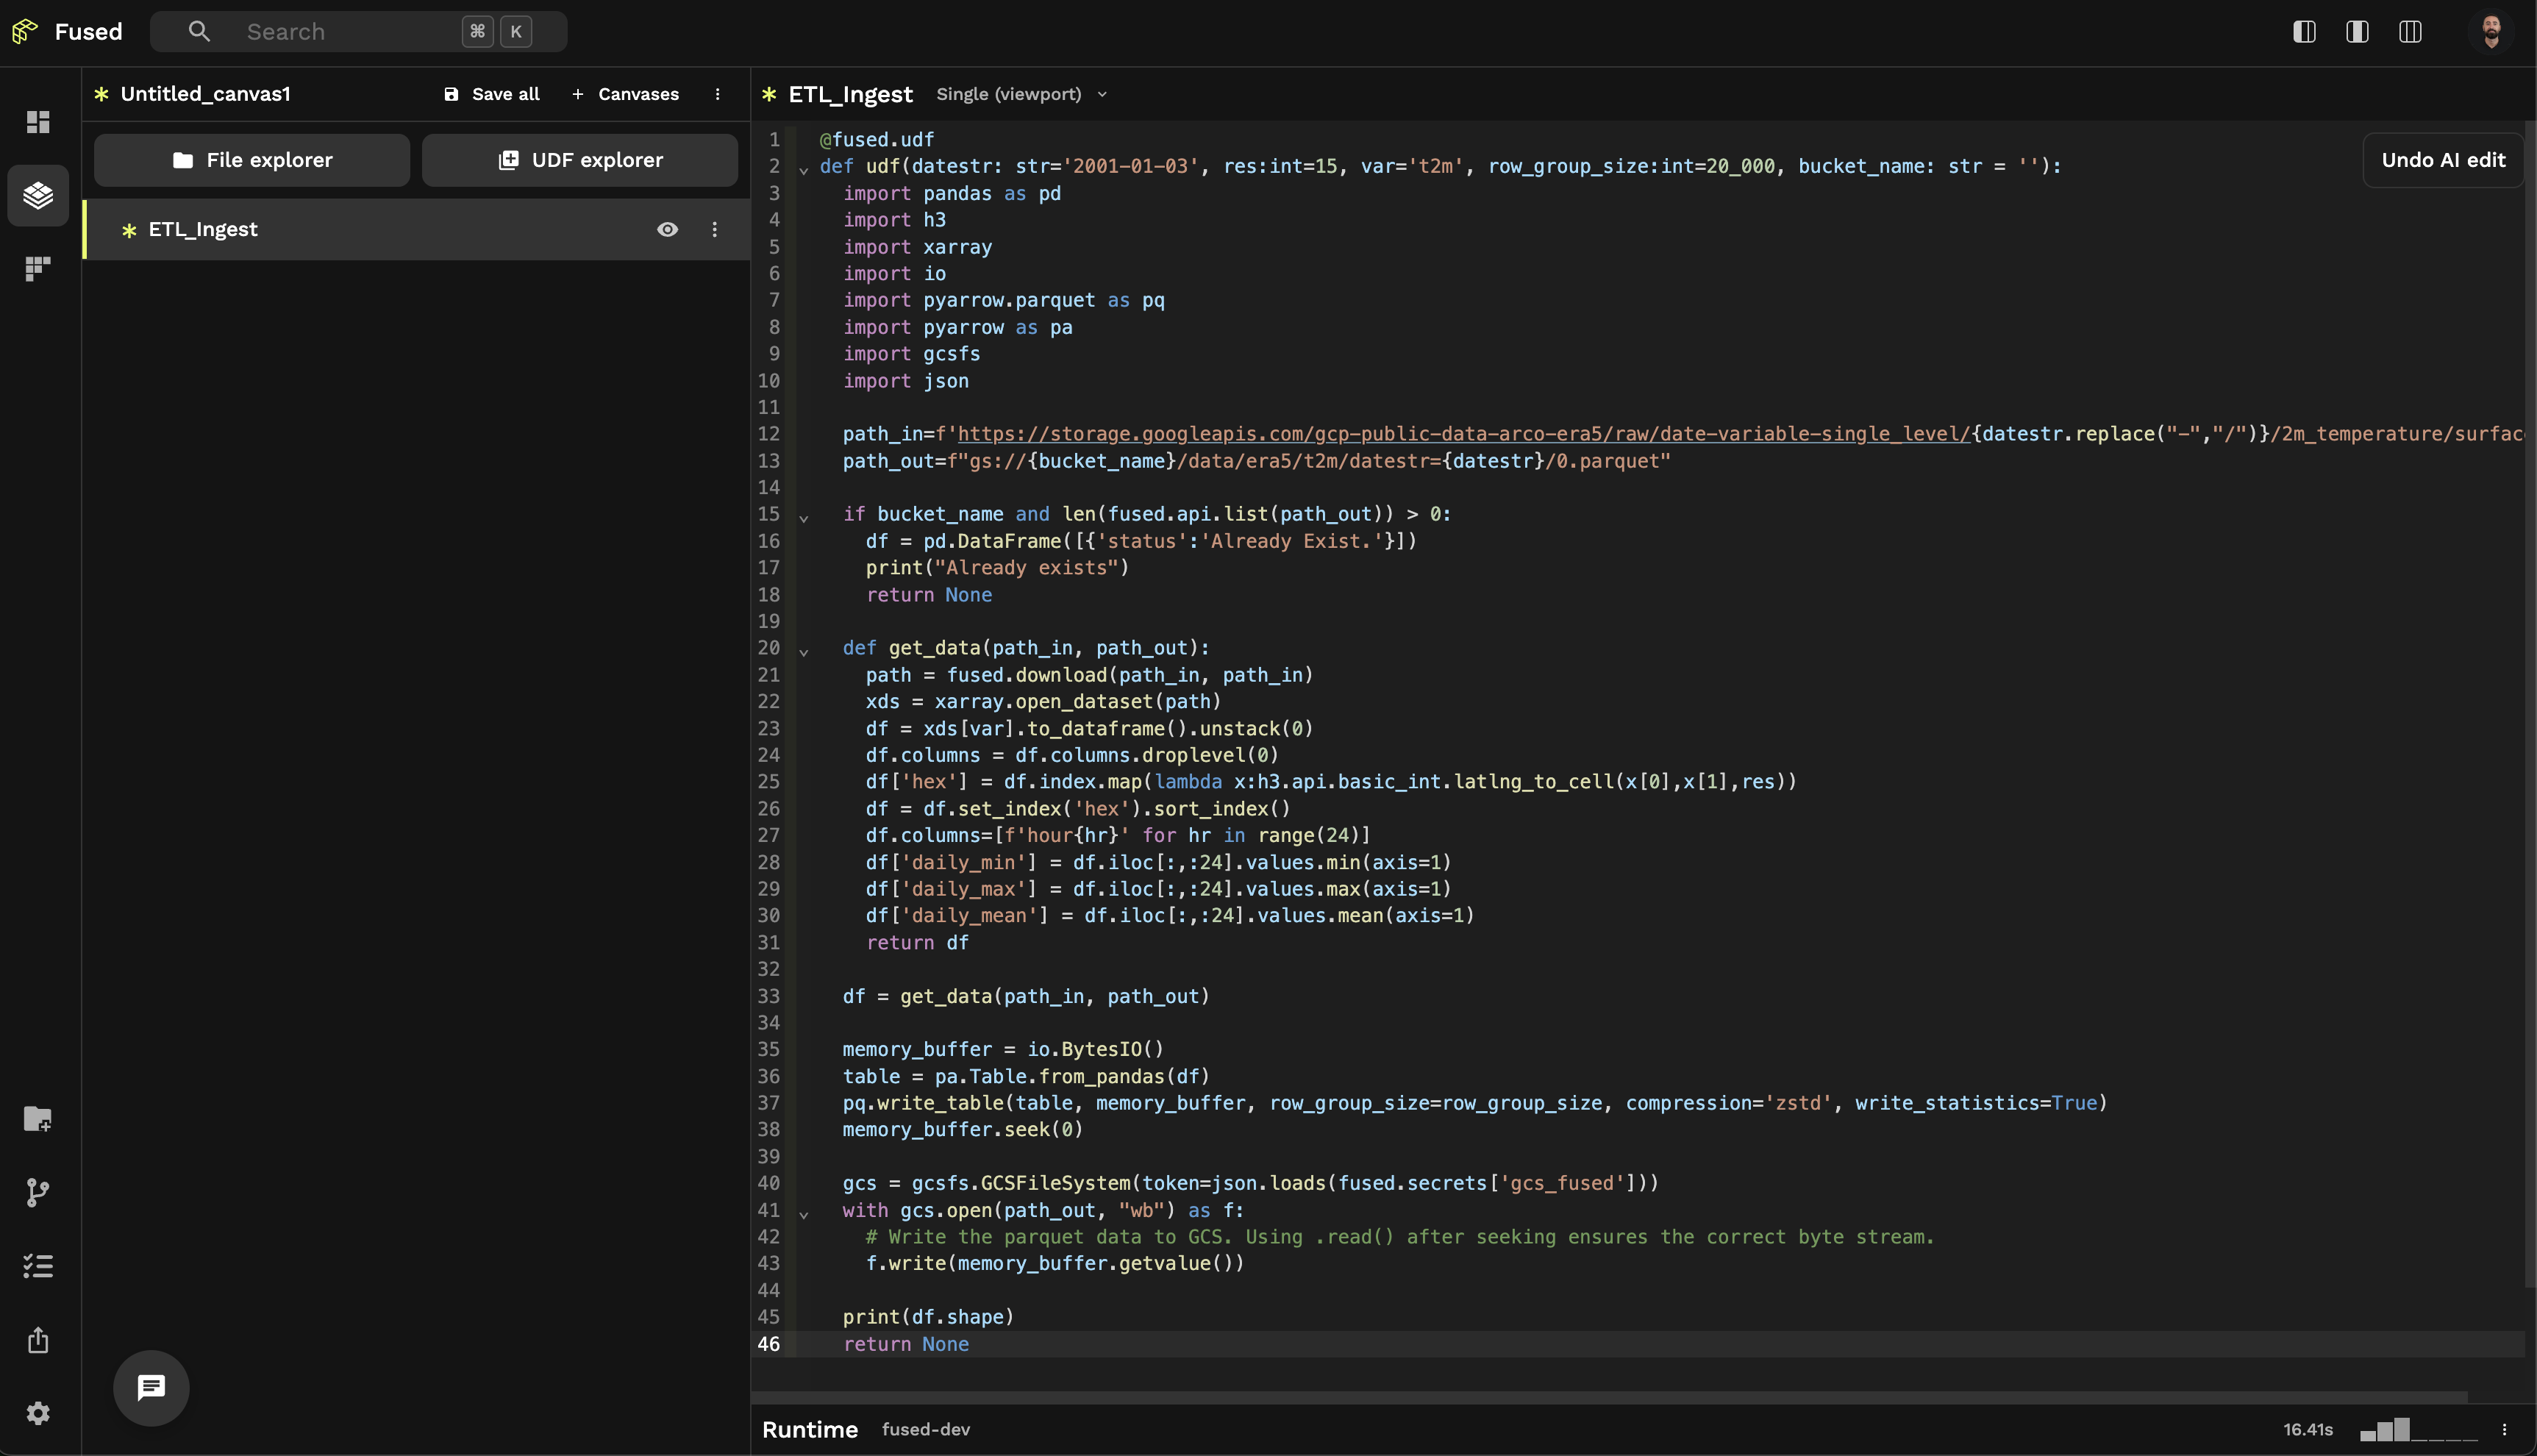
7. Run Fused API: Example with ETL Ingest UDF
Now that we've tested a simple UDF we can move to a more useful UDF
Step 1: Open Fused Workbench, create a "New UDF" and copy this UDF to Workbench:
You'll need a GCS Bucket to save this to, pass it to bucket_name in the UDF definition for now
@fused.udf
def udf(datestr: str='2001-01-03', res:int=15, var='t2m', row_group_size:int=20_000, bucket_name:str):
  import pandas as pd
  import h3
  import xarray
  import io
  import pyarrow.parquet as pq
  import pyarrow as pa
  import gcsfs
  import json

  path_in=f'https://storage.googleapis.com/gcp-public-data-arco-era5/raw/date-variable-single_level/{datestr.replace("-","/")}/2m_temperature/surface.nc'
  path_out=f"gs://{bucket_name}/data/era5/t2m/datestr={datestr}/0.parquet"

  if len(fused.api.list(path_out))>0:
    df = pd.DataFrame([{'status':'Already Exist.'}])
    print("Already exists")
    return None

  def get_data(path_in, path_out):
    path = fused.download(path_in, path_in)
    xds = xarray.open_dataset(path)
    df = xds[var].to_dataframe().unstack(0)
    df.columns = df.columns.droplevel(0)
    df['hex'] = df.index.map(lambda x:h3.api.basic_int.latlng_to_cell(x[0],x[1],res))
    df = df.set_index('hex').sort_index()
    df.columns=[f'hour{hr}' for hr in range(24)]
    df['daily_min'] = df.iloc[:,:24].values.min(axis=1)
    df['daily_max'] = df.iloc[:,:24].values.max(axis=1)
    df['daily_mean'] = df.iloc[:,:24].values.mean(axis=1)
    return df

  df = get_data(path_in, path_out)

  memory_buffer = io.BytesIO()
  table = pa.Table.from_pandas(df)
  pq.write_table(table, memory_buffer, row_group_size=row_group_size, compression='zstd', write_statistics=True)
  memory_buffer.seek(0)

  gcs = gcsfs.GCSFileSystem(token=json.loads(fused.secrets['gcs_fused']))
  with gcs.open(path_out, "wb") as f:
    f.write(memory_buffer.getvalue())

  print(df.shape)
  return None
Step 2: Rename this UDF to "ETL_Ingest"
Step 3: Start a Python shell
python
Step 4: Run UDF
# Run this locally - not in Workbench
import fused
import pandas as pd
fused.api.FusedAPI()

udf = fused.load("ETL_ingest")
start_datestr='2020-02-01'; end_datestr='2020-03-01';
arg_list = pd.date_range(start=start_datestr, end=end_datestr).strftime('%Y-%m-%d').tolist()
job = udf(arg_list=arg_list)

fused.api.FusedDockerAPI(
  set_global_api=True,
  is_gcp=True,
  repository="us-west1-docker.pkg.dev/daring-agent-375719/fused-job2/fused-job2",
  additional_docker_args=[
    "-e","FUSED_SERVER_ROOT=https://app.fused.io/server/v1", "-v", "./.fused:/root/.fused"
  ]
)

job_status = job.run_batch()
job_status.run_and_tail_output()
Commands
run-config
run-config runs the user's jobs. The job configuration can be specified either on the command line, as a local file path, or as an S3/GCS path. In all cases the job configuration is loaded as JSON.
Options:
  --config-from-gcs FILE_NAME   Job step configuration, as a GCS path
  --config-from-s3 FILE_NAME    Job step configuration, as a S3 path
  --config-from-file FILE_NAME  Job step configuration, as a file name the
                                application can load (i.e. mounted within the
                                container)
  -c, --config JSON             Job configuration to run, as JSON
  --help                        Show this message and exit.
version
Prints the container version and exits.
Environment Variables
The on-prem container can be configured with the followin environment variables.
FUSED_AUTH_TOKEN: Fused token for the licensed user or team. When using the FusedDockerAPI, this token is automatically retrieved.FUSED_DATA_DIRECTORY: The path to an existing directory to be used for storing temporary files. This can be the location a larger volume is mounted inside the container. Defaults to Python's temporary directory.FUSED_GCP: If "true", enable GCP specific features. Defaults to false.FUSED_AWS: If "true", enable AWS specific features. Defaults to false.FUSED_AWS_REGION: The current AWS region.FUSED_LOG_MIN_LEVEL: Only logs with this level of severity or higher will be emitted. Defaults to "DEBUG".FUSED_LOG_SERIALIZE: If "true", logs will be written in serialized, JSON form. Defaults to false.FUSED_LOG_AWS_LOG_GROUP_NAME: The CloudWatch Log Group to emit logs to. Defaults to not using CloudWatch Logs.FUSED_LOG_AWS_LOG_STREAM_NAME: The CloudWatch Log Stream to create and emit logs to. Defaults to not using CloudWatch Logs.FUSED_PROCESS_CONCURRENCY: The level of process concurrency to use. Defaults to the number of CPU cores.FUSED_CREDENTIAL_PROVIDER: Where to obtain AWS credentials from. One of "default" (default to ec2 on AWS, or none otherwise), "none", "ec2" (use the EC2 instance metadata), or "earthdata" (use EarthData credentials inFUSED_EARTHDATALOGIN_USERNAMEandFUSED_EARTHDATALOGIN_PASSWORD).FUSED_EARTHDATALOGIN_USERNAME: Username when using earthdata credential provider, above.FUSED_EARTHDATALOGIN_PASSWORD: Password when using earthdata credential provider, above.FUSED_IGNORE_ERRORS: If "true", continue processing even if some computations throw errors. Defaults to false.FUSED_DISK_SPACE_GB: Maximum disk space available to the job, e.g. for temporary files on disk, in gigabytes.
Connecting an encrypted S3 bucket
To connect an encrypted S3 bucket, access to both the bucket and the KMS key is required. The KMS key must be in the same region as the bucket. The following steps are required to connect an encrypted S3 bucket:
- Configure KMS policy
{
  "Sid": "AllowCrossAccountUseOfKMS",
  "Effect": "Allow",
  "Principal": {
    "AWS": "arn:aws:iam::<FUSED_ACCOUNT>:role/<FUSED_ROLE_NAME>"
  },
  "Action": [
    "kms:Decrypt",
    "kms:Encrypt",
    "kms:GenerateDataKey*",
    "kms:DescribeKey"
  ],
  "Resource": "*"
}
- Configure S3 bucket policy
{
  "Version": "2012-10-17",
  "Statement": [
    {
      "Effect": "Allow",
      "Principal": {
        "AWS": "arn:aws:iam::<FUSED_ACCOUNT>:role/<FUSED_ROLE_NAME>"
      },
      "Action": "s3:*",
      "Resource": [
        "arn:aws:s3:::<BUCKET_NAME>",
        "arn:aws:s3:::<BUCKET_NAME>/*"
      ]
    }
  ]
}